Home All About the forgotten flavours.(Pumpkins)
IN THE SPOTLIGHT…All About the forgotten flavours (Pumpkins)

All About the forgotten flavours at the end of the list…this month I find I cannot miss out on my beloved pumpkins!
April is a perfect moment to get pumpkins started, one seed per pot, on a window-sill. These three are lurking at the end of our packed pumpkin section, please give them a chance to shine in your garden
Mammoth Gold: I am going all out for this variety… featuring it here plus it has a place in a special offer this month. I think it is the ‘mammoth’ bit of its name that is putting you off trying this one out. We do say that with perfect conditions you could be the proud grower of a 45kg pumpkin however, this is unlikely with the imperfect UK weather. You, like us, are far more likely to grow the much more conveniently sized 9-12kg sized pumpkins. And at that size your will discover some very tasty pumpkins perfect for stews & casseroles, sauces and soups… and a great size for trying out a bit of pumpkin carving.
Orange Smoothie: poor Orange Smoothie is one of the best behaved pumpkins you could possibly desire. Why are you not beating down our door to get your hands on this gorgeous offering? First off this has a compact semi dwarf habit, that’s right, this is a pumpkin that stays put and doesn’t go wandering off all over your garden! In fact Orange Smoothie is so well behaved it will happily stay put in a large pot – that’s right, you can grow this one on your patio or balcony! That will just leave you looking forward to their perfectly smooth globe fruits that are a very manageable and delicious 2-3.5kg size. What is there not to love about this pumpkin?
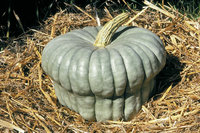
Queensland Blue: I wrote about this fabulous variety last year and told you all that it hailed from Australia almost 90 years ago, that it has outstanding natural sweetness and longevity in storage. We think that this is a beautiful heirloom producing deeply ribbed fruits with bluish-green skin (hence their name). Even though these are delicious and are ready to harvest after about 14 weeks, this variety is still being overlooked! Perhaps the solution is to list them first or perhaps by featuring them here I will convert you all to loving Queensland Blue as much as we do.

